Personal Cloud Storage with Pogoplug
![]()
I recently bought a Pogoplug to see if it would work out for me with sharing picture and other files with family and friends. For the most part this device really works well. Installation is simple and the device uses very little electricity. The Pogoplug only uses 4 watts of electricity compared to a standard computer, which draws anywhere from 65 – 250 watts of electricity. You just unpack it from the box, connect the cables and USB storage, and activate it. Then you can share pictures, file, videos, and music; anywhere as long as you have an Internet connection. There are apps that also allow you to share files with Blackberry’s, Android phones, and iPhones. There is also a program that allows you to drag and drop files and pictures on to the Pogoplugs storage from a Windows or Linux machine. If you want to share a file or pictures with a friend you just share the file in the Pogoplug web page and send an email to the person. Then they simple create a password and they can view or use that file the same way you can.

I have a Pogoplug v2. It has four USB ports, one in the front and three in the back. I picked up this Here are the complete specs:
- Power requirements
- 100-240V, 50/60HZ
- Drive Formats
- NTFS, FAT32, Mac OS Extended Journaled and non-Journaled (HFS+), EXT-2/EXT-3
- Web browsers
- Safari, Firefox 3, IE 7, IE 8, Chrome
- Operating Systems
- MS Windows XP, Vista, Windows 7, Mac OS X 10.4 and above (Intel and PowerPC), 32bit kernel only, Linux
External
- 1 Front-Facing USB 2.0 Port
- 3 Rear USB 2.0 Ports
- 1 Gigabit Ethernet Port
- Regular Power cable (Not a brick)
- Power/Activity LED
Internal
- 256MB RAM
- 128MB NAND (32MB root partition, 92MB mtdblock3 partition)
- Marvell Sheeva CPU, 1.2GHz
- Serial port
Operating System
- Linux 2.6.22.18
- Bash 3.2
- BusyBox 1.7.0
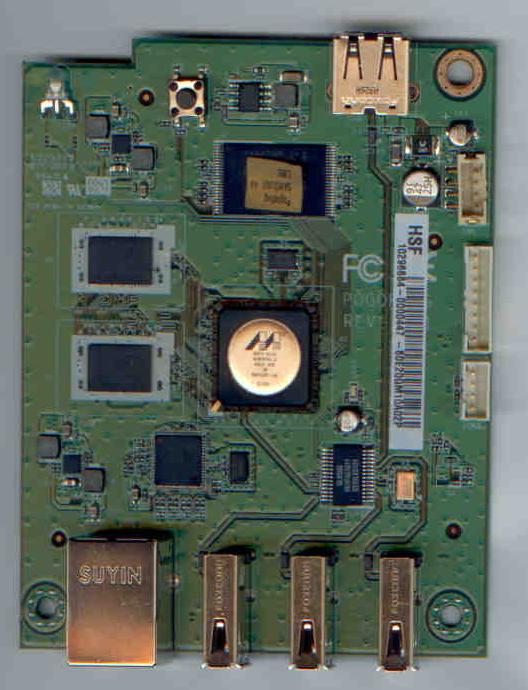
All in all this is an embedded Linux computer that has plenty of options. Here is a pic of the motherboard:

The main reason that I bought one of these devices was the fact that you can do other things with it. Once I used it for its intended purpose I liked it so I bought another one to try to break. You can install Openpogo on the device, which allows for installation of packages and can be used for development of uses for the Pogoplug. I think it is called Plugbox Linux now and the thing that caught my eye was making it into a web server. I will go into it a little later but here is a Youtube video that explains the process.
First thing for references is this website: http://plugapps.com/index.php5?title=Main_Page . This website has device information, Plugbox Linux, and much more. There is also another site http://www.pogoplugged.com/. This is the community site for Pogoplug. It also has a great deal of information on the site.
To turn you device into a web server follow these steps.
- Enable SSH on your Pogoplug by going to the Pogoplug website and enabling it.
- SSH into you device and enter killall hbwd to stop Pogoplug services
- Then enter the following commands: cd /tmp
wget http://plugapps.com/os/pogoplug/uboot/install_uboot_mtd0.sh
chmod +x install_uboot_mtd0.sh
./install_uboot_mtd0.sh - Once the script has been run you will need to partition a USB drive. Start with /sbin/fdisk /dev/sda
- Then you will need to run the following: wget http://plugapps.com/os/pogoplug/mke2fs
chmod 755 mke2fs
./mke2fs /dev/sda1
mkdir usb
mount /dev/sda1 usb - Then download Plugbox Linux run the following commands: cd usb
wget http://plugapps.com/os/1.1/Plugbox-Linux-1.1-rootfs.tar.gz
tar -xzvf Plugbox-Linux-1.1-rootfs.tar.gz # This will take a long time
rm Plugbox-Linux-1.1-rootfs.tar.gz - If everything installed correctly enter: umount usb and /sbin/reboot
- Once it comes back up you can update it by entering pacman -Syu
- With everything updated you will want to enter a new password and set the date and time
- You can enter the following commands to install the LAMP components to the device: pacman -Sy apache mysql php pacman -Sy lynx
- You will need to setup a user using: useradd -d /srv/http -r -s /bin/false -U http
- Edit your /etc/hosts file and make sure the machine name matches whats in the /etc/rc.conf file.
- With everything setup just enter /etc/rc.d/httpd start to start the web server.
Everything else is up to you. These instructions are simple steps. If you need more instructions watch the video or go to http://lifehacker.com/#!5637092/turn-a-pogoplug-into-a-fully+featured-linux-web-server for more in depth instructions.
This is a great device even for its manufactured purpose. It is Linux based and can be used for anything with just a little time and imagination. Check it out at http://www.pogoplug.com/home-en.html? and other plug computers at http://www.openplug.org/. It is great for accessing your files anywhere you have a Internet connection. You can also print from your mobile device along will having continuously mirroring all or part of your Pogoplug storage to a second Pogoplug in another location. Do some research and check it out you may like what you see.
UPDATE UPDATE UPDATE UPDATE
There has been a change in the links for the websites. Here is a link to the current source as of 28Jun12. There is also a new guide there with all the links you will need to install Arch Linux. http://archlinuxarm.org/platforms/armv5/pogoplug-v2-pinkgray


